Advanced SEO Blogspot – Search Preference Settings
Every time we discuss something related to SEO, the phrase that you often hear is "SEO Friendly".
This article explains several blogger search settings that you can use to make your blog SEO-friendly. This setting is not available before March 2012.
In the past, when Blogspot was compared to WordPress, WordPress won every time. But with this arrangement, Google has greatly narrowed the gap between the two.
As we know, Blogspot or Blogger is one of Google's most popular and user-friendly platforms. Several factors that influence blog performance, such as B. page speed, image compression, and cache are taken into account by the platform itself with great added value.
However, there are certain elements that you need to configure manually to make your blog more optimized or SEO-friendly.
Some of these settings determine which parts of your blog are indexed by search engines. Therefore, follow these steps carefully.
Before we begin this tutorial, we discuss some basic SEO elements in the previous article
Keyword research
content planning
optimization headlines
Manage contributions
Image enhancement
URL optimization
Fight spam
If you have already configured your search settings, I highly recommend reading this article on Basic Blogspot SEO.
Contents
Advanced SEO Settings in Blogger
Meta Tags
Custom Page Not Found
Custom Redirect
Custom Robots.txt
Custom Robots Header Tags
Enabling HTTPS
NoFollow Link
Final Words
Advanced SEO Settings in Blogger.

Let's start with the instructions
Open the Blogspot dashboard and go to Settings >> Search Settings
meta Tags
Under the meta tag you will find a description, which is disabled by default. This description is a summary of your blog that appears on search engine search results pages.
Try to be as clear as possible because this description will let users know about your blog. This will also help increase clickthrough rates, which affects ranking. This is the meta description of SERPs

Before we proceed and activate this setting, I want to let you know when you activate it. You can add a description to your page and post that you cannot.
To activate the description, click Edit. I will ask you if you want to activate the search description. Choose yes.
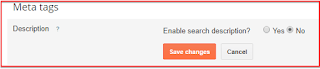
When you select yes, a box will appear where you can add a search description for your blog.

Meta descriptions can contain up to 150 characters. After entering the description, you must save the latest changes.
Add meta descriptions to Blogger posts and pages
As mentioned above, if you enable meta descriptions in search settings, you can also describe meta for your posts and pages.
Add meta descriptions to posts or pages. Scroll to Posts or Pages and click Edit. You will be redirected to the editor and have a new option labeled Search on the right.
Click on it and you will be shown where to enter the description. Click Finish when you are finished, then click Update to save your changes.

Points to remember
Your blog description is the main ad slot for SERP. Remember user intentions as you type.
You can add keywords, but it won't be used too much because it looks like spam.
Don't use descriptions on many pages. The search engine does not display such descriptions.
Custom Page Not Found
As the name suggests, this setting allows you to create special HTML messages that will appear on the 404 error page instead of general messages.
What is error 404?
Error 404 occurs when the webpage is not found. This can be done in two conditions
Either the link is broken or the page has been moved.
The URL entered is incorrect.

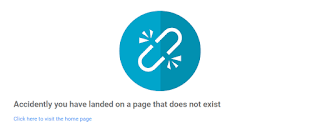
The above is a screenshot of page 404 and clearly shows the message "The page you are looking for does not exist".
How to make a special 404 page on Blogspot
In the "Errors and redirects" section of your search settings, make the "Custom page not found" setting. By default it says not set.

Click edit and it will show you a box where you can add the HTML code.

After entering the code, you must save the changes made last. We create HTML messages specifically for demonstration purposes. Below is a screenshot.
This is a very simple 404 message. You can add images and also connect your account to social media. It can act as a CTA. I just want to say here that you are as creative as you want with personalized messaging features.
Custom Redirect
Custom redirects are very important settings if you want to redirect bad pages from your site to relevant work pages.
For example, suppose you have a blog page with the URL example.com/broken-link and for some reason the page is removed. This means that the connection has been lost. Every person who visits this page has 404 pages.
And you do not want that. You want visitors to land on relevant pages. And this page is example.com/new-link and the function you need for this transfer is Custom Redirects.
How to set up special redirects on Blogger
This function is available in the search settings under the heading Errors and redirects.
To set up custom redirects, all you have to do is click Edit and enter the broken link or removed URL in "From" and the new URL in "To".

And finally, you must click Save Changes
Custom Robots.txt
To understand and use these settings, you must first find out what to do
What is Robots.txt?
Robots.txt is a text file that a website uses to tell a search engine or search engine bot which parts of a website do not need to be indexed or processed.
With Blogger or Blogspot, the platform creates a robots.txt file for you. You can change it with special Robots.txt settings.
To search for robots.txt, all you have to do is enter the URL below in your browser's address bar and replace "example" with your domain name.
And here is how the robots.txt file looks like

In addition, there are several areas of your website where you don't want to search for bots in search engines, such as: For example, categories, archives, labels, search pages, thank you pages, duplicate content pages, and more. You can do this from this file.
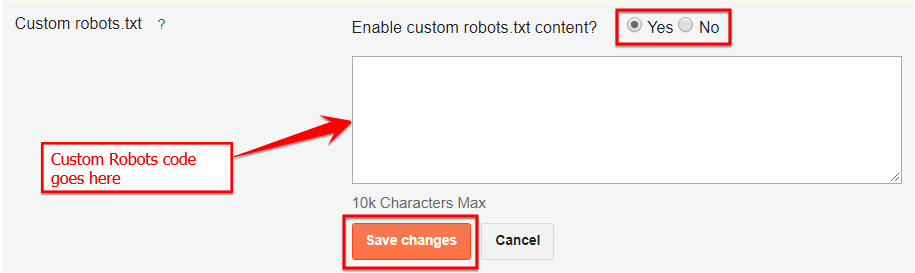
Here's how to activate a special Robots.txt file on Blogspot
You can find special Robots.txt settings on the Scanners and Indexing tabs. All you have to do is click on Edit and you will be asked if you want to enable "custom robots.txt".

If you want to create a custom robots.txt file select Yes and it will show a box where you can enter the robots.txt code and once done click Save Changes.
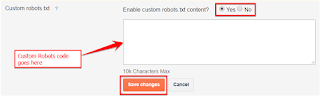
Note - As you can see on the screen above, the platform displays a warning to use this setting carefully. I also want to ask you to only use this setting if you are happy with robotics guidelines or if a small error can cause important parts of your website to be indexed.
Now when you think about blocking archives, searches, and other similar pages, let me tell you that you can easily block them with special robot header tags, and we will discuss this further.
Special robot title titles
Special tags for robotic titles are meta tags that follow a page-based approach and instruct search engines how to crawl and index individual pages.
The following is a list of all guidelines

To set a specific tag for the robot title, you must go to Search Settings. Under the heading "Scanner and Indexing" you will find special tags for the robot titles.
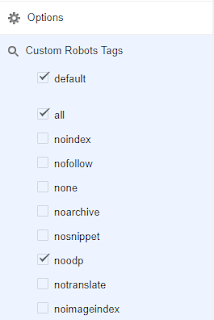
Click the Edit button and you will be asked if you want to activate it.

If you select "Yes", a form will appear where you can select the robot's title tag and apply it to a page like "Yes"
At home
Back up and search
Contribution and standard pages
We have made arrangements and you can use the same settings for your blog.

After you make the settings, you must save the latest changes.
As mentioned earlier, this tag works at one page level. If you configure it, you can also set this tag when writing new posts or for existing posts.
And for this, you have successfully configured your preferred search settings. However, there are two other points that we will discuss in this article.
Enable HTTPS
One of the first things people look for on a website is security. And the website is protected with an SSL certificate. Before you start thinking about where to get it for your blog.
I want to tell you that one of the best things about the Blogger platform is that you can protect your blog with one click. This feature is not limited to Blogspot subdomain blogs. This means that you can also use this feature if you use a domain username on your Blogger blog.
How to enable HTTPS on Blogger
To enable HTTPS on Blogger, go to Settings >> General >> HTTPS
Under the HTTPS header you will see the settings for HTTPS switching and the drop-down menu right in front of it. Choose yes

As you can see on the screen above, when HTTPS redirection is activated, all visitors are shown a page with an encrypted connection. There will also be 2 versions available on your website, visitors who landed via HTTP will be served via an unencrypted connection, and those who landed via HTTPS will be served via a secure connection.
Remember that Google prefers HTTPS over HTTP and this is a ranking signal.
NoFollow Link
The nofollow link gets its name from the Nofollow value specified for the "rel" HTML attribute. As the name suggests, Nofollow instructs search engines not to follow relevant links or pages. This means that the bot ignores this connection and has no value.
Which outbound links should NoFollow follow?
.
All links are intended for advertising purposes. It doesn't matter whether it's an affiliate link or sponsored content, it has to be NoFollow.
Spam is a big problem. You will often see that you can find the spam link in the comments section if you can comment on a website without moderation. Using NoFollow can prevent your blog from transferring funds to a bad website. Filtering spam on WordPress is easy because you can use plugins like Akismet Antispam and Blogspot and you need to enable comment moderation.
Likewise, if your website allows you to publish user-generated content without moderation, NoFollow helps you not to credit spammy websites and doesn't have to be punished.
However, adding NoFollow to the link is a very simple task. All you have to do is, if you can connect to the source in the editor, select the "Add rel = nofollow" attribute. And press OK to save changes

You might also notice that there is another option above the "rel nofollow" attribute that says that the link will open in a new tab.
If you choose this option, the link will open in a new tab. I highly recommend using this option when connecting to third-party sources.
Using this feature also increases downtime or bounces because people who click the link remain on your page instead of opening the link in the same area where they should leave your site.
Last words
When it comes to SEO and increasing online reach, your domain name plays a very important role. Using these settings will definitely make your blog SEO-friendly, but the brand is incomplete without a custom domain name.
If you use a subdomain, I highly recommend switching to a domain username because it looks more professional, reliable, and preferred than the subdomain search engine.
Point domain
Before continuing, I want to review the handling of custom robots.txt settings and special robot title tag settings. This setting is very powerful and it is important to understand the guidelines before using it.
I hope you find this article and use these settings to make your blog more optimized for SEO. If you have questions, please contact us through the comments section. Don't forget to share this tutorial with your friends on social media.
To stay up-to-date, follow us on social media and subscribe to our newsletter to receive updates directly in your inbox.
This article explains several blogger search settings that you can use to make your blog SEO-friendly. This setting is not available before March 2012.
In the past, when Blogspot was compared to WordPress, WordPress won every time. But with this arrangement, Google has greatly narrowed the gap between the two.
As we know, Blogspot or Blogger is one of Google's most popular and user-friendly platforms. Several factors that influence blog performance, such as B. page speed, image compression, and cache are taken into account by the platform itself with great added value.
However, there are certain elements that you need to configure manually to make your blog more optimized or SEO-friendly.
Some of these settings determine which parts of your blog are indexed by search engines. Therefore, follow these steps carefully.
Before we begin this tutorial, we discuss some basic SEO elements in the previous article
Keyword research
content planning
optimization headlines
Manage contributions
Image enhancement
URL optimization
Fight spam
If you have already configured your search settings, I highly recommend reading this article on Basic Blogspot SEO.
Contents
Advanced SEO Settings in Blogger
Meta Tags
Custom Page Not Found
Custom Redirect
Custom Robots.txt
Custom Robots Header Tags
Enabling HTTPS
NoFollow Link
Final Words
Advanced SEO Settings in Blogger.

Let's start with the instructions
Open the Blogspot dashboard and go to Settings >> Search Settings
meta Tags
Under the meta tag you will find a description, which is disabled by default. This description is a summary of your blog that appears on search engine search results pages.
Try to be as clear as possible because this description will let users know about your blog. This will also help increase clickthrough rates, which affects ranking. This is the meta description of SERPs

Before we proceed and activate this setting, I want to let you know when you activate it. You can add a description to your page and post that you cannot.
To activate the description, click Edit. I will ask you if you want to activate the search description. Choose yes.

When you select yes, a box will appear where you can add a search description for your blog.

Meta descriptions can contain up to 150 characters. After entering the description, you must save the latest changes.
Add meta descriptions to Blogger posts and pages
As mentioned above, if you enable meta descriptions in search settings, you can also describe meta for your posts and pages.
Add meta descriptions to posts or pages. Scroll to Posts or Pages and click Edit. You will be redirected to the editor and have a new option labeled Search on the right.
Click on it and you will be shown where to enter the description. Click Finish when you are finished, then click Update to save your changes.

Points to remember
Your blog description is the main ad slot for SERP. Remember user intentions as you type.
You can add keywords, but it won't be used too much because it looks like spam.
Don't use descriptions on many pages. The search engine does not display such descriptions.
Custom Page Not Found
As the name suggests, this setting allows you to create special HTML messages that will appear on the 404 error page instead of general messages.
What is error 404?
Error 404 occurs when the webpage is not found. This can be done in two conditions
Either the link is broken or the page has been moved.
The URL entered is incorrect.

The above is a screenshot of page 404 and clearly shows the message "The page you are looking for does not exist".
How to make a special 404 page on Blogspot
In the "Errors and redirects" section of your search settings, make the "Custom page not found" setting. By default it says not set.

Click edit and it will show you a box where you can add the HTML code.

After entering the code, you must save the changes made last. We create HTML messages specifically for demonstration purposes. Below is a screenshot.

This is a very simple 404 message. You can add images and also connect your account to social media. It can act as a CTA. I just want to say here that you are as creative as you want with personalized messaging features.
Custom Redirect
Custom redirects are very important settings if you want to redirect bad pages from your site to relevant work pages.
For example, suppose you have a blog page with the URL example.com/broken-link and for some reason the page is removed. This means that the connection has been lost. Every person who visits this page has 404 pages.
And you do not want that. You want visitors to land on relevant pages. And this page is example.com/new-link and the function you need for this transfer is Custom Redirects.
How to set up special redirects on Blogger
This function is available in the search settings under the heading Errors and redirects.
To set up custom redirects, all you have to do is click Edit and enter the broken link or removed URL in "From" and the new URL in "To".

And finally, you must click Save Changes
Custom Robots.txt
To understand and use these settings, you must first find out what to do
What is Robots.txt?
Robots.txt is a text file that a website uses to tell a search engine or search engine bot which parts of a website do not need to be indexed or processed.
With Blogger or Blogspot, the platform creates a robots.txt file for you. You can change it with special Robots.txt settings.
To search for robots.txt, all you have to do is enter the URL below in your browser's address bar and replace "example" with your domain name.
https://smartzonedaily.com/robots.txt
And here is how the robots.txt file looks like

In addition, there are several areas of your website where you don't want to search for bots in search engines, such as: For example, categories, archives, labels, search pages, thank you pages, duplicate content pages, and more. You can do this from this file.
Here's how to activate a special Robots.txt file on Blogspot
You can find special Robots.txt settings on the Scanners and Indexing tabs. All you have to do is click on Edit and you will be asked if you want to enable "custom robots.txt".

If you want to create a custom robots.txt file select Yes and it will show a box where you can enter the robots.txt code and once done click Save Changes.
Note - As you can see on the screen above, the platform displays a warning to use this setting carefully. I also want to ask you to only use this setting if you are happy with robotics guidelines or if a small error can cause important parts of your website to be indexed.
Now when you think about blocking archives, searches, and other similar pages, let me tell you that you can easily block them with special robot header tags, and we will discuss this further.
Special robot title titles
Special tags for robotic titles are meta tags that follow a page-based approach and instruct search engines how to crawl and index individual pages.
The following is a list of all guidelines

To set a specific tag for the robot title, you must go to Search Settings. Under the heading "Scanner and Indexing" you will find special tags for the robot titles.
Click the Edit button and you will be asked if you want to activate it.

If you select "Yes", a form will appear where you can select the robot's title tag and apply it to a page like "Yes"
At home
Back up and search
Contribution and standard pages
We have made arrangements and you can use the same settings for your blog.

After you make the settings, you must save the latest changes.
As mentioned earlier, this tag works at one page level. If you configure it, you can also set this tag when writing new posts or for existing posts.

And for this, you have successfully configured your preferred search settings. However, there are two other points that we will discuss in this article.
Enable HTTPS
One of the first things people look for on a website is security. And the website is protected with an SSL certificate. Before you start thinking about where to get it for your blog.
I want to tell you that one of the best things about the Blogger platform is that you can protect your blog with one click. This feature is not limited to Blogspot subdomain blogs. This means that you can also use this feature if you use a domain username on your Blogger blog.
How to enable HTTPS on Blogger
To enable HTTPS on Blogger, go to Settings >> General >> HTTPS
Under the HTTPS header you will see the settings for HTTPS switching and the drop-down menu right in front of it. Choose yes

As you can see on the screen above, when HTTPS redirection is activated, all visitors are shown a page with an encrypted connection. There will also be 2 versions available on your website, visitors who landed via HTTP will be served via an unencrypted connection, and those who landed via HTTPS will be served via a secure connection.
Remember that Google prefers HTTPS over HTTP and this is a ranking signal.
NoFollow Link
The nofollow link gets its name from the Nofollow value specified for the "rel" HTML attribute. As the name suggests, Nofollow instructs search engines not to follow relevant links or pages. This means that the bot ignores this connection and has no value.
Which outbound links should NoFollow follow?
.
All links are intended for advertising purposes. It doesn't matter whether it's an affiliate link or sponsored content, it has to be NoFollow.
Spam is a big problem. You will often see that you can find the spam link in the comments section if you can comment on a website without moderation. Using NoFollow can prevent your blog from transferring funds to a bad website. Filtering spam on WordPress is easy because you can use plugins like Akismet Antispam and Blogspot and you need to enable comment moderation.
Likewise, if your website allows you to publish user-generated content without moderation, NoFollow helps you not to credit spammy websites and doesn't have to be punished.
However, adding NoFollow to the link is a very simple task. All you have to do is, if you can connect to the source in the editor, select the "Add rel = nofollow" attribute. And press OK to save changes

You might also notice that there is another option above the "rel nofollow" attribute that says that the link will open in a new tab.
If you choose this option, the link will open in a new tab. I highly recommend using this option when connecting to third-party sources.
Using this feature also increases downtime or bounces because people who click the link remain on your page instead of opening the link in the same area where they should leave your site.
Last words
When it comes to SEO and increasing online reach, your domain name plays a very important role. Using these settings will definitely make your blog SEO-friendly, but the brand is incomplete without a custom domain name.
If you use a subdomain, I highly recommend switching to a domain username because it looks more professional, reliable, and preferred than the subdomain search engine.
Point domain
Before continuing, I want to review the handling of custom robots.txt settings and special robot title tag settings. This setting is very powerful and it is important to understand the guidelines before using it.
I hope you find this article and use these settings to make your blog more optimized for SEO. If you have questions, please contact us through the comments section. Don't forget to share this tutorial with your friends on social media.
To stay up-to-date, follow us on social media and subscribe to our newsletter to receive updates directly in your inbox.

Comments
Post a Comment